
Contents
Invisalign with Elastics (Rubber Bands) in 2026: Purpose, Placement, Wear Time & Bite Correction Guide
If your orthodontist has told you that your Invisalign treatment will include rubber bands -- formally called orthodontic elastics -- you may be wondering why clear aligners alone are not enough. The answer lies in physics: Invisalign trays are extraordinarily effective at moving individual teeth within a single dental arch, but they have inherent limitations when it comes to correcting the relationship between your upper and lower jaws. That jaw-to-jaw correction is exactly what elastics provide.
According to Align Technology's 2025 clinical data, approximately 35 to 40 percent of all Invisalign Comprehensive cases now incorporate elastics at some stage of treatment. That number has risen steadily as orthodontists have expanded the range of cases they treat with clear aligners rather than referring patients to traditional braces. This 2026 guide covers everything you need to know about Invisalign elastics: the biomechanics behind them, the different types, how to place and manage them, compliance requirements, and what happens if you do not wear them as prescribed.
Why Invisalign Sometimes Needs Rubber Bands
Invisalign aligners work by encasing each dental arch in a precision-engineered shell of SmartTrack thermoplastic. The shell applies controlled forces to individual teeth, tipping them, rotating them, or bodily moving them to their planned positions. However, because the upper aligner and lower aligner are completely separate pieces, they cannot generate forces between the arches. They cannot, on their own, push the lower jaw forward, pull the upper jaw back, or correct the vertical relationship between upper and lower teeth.
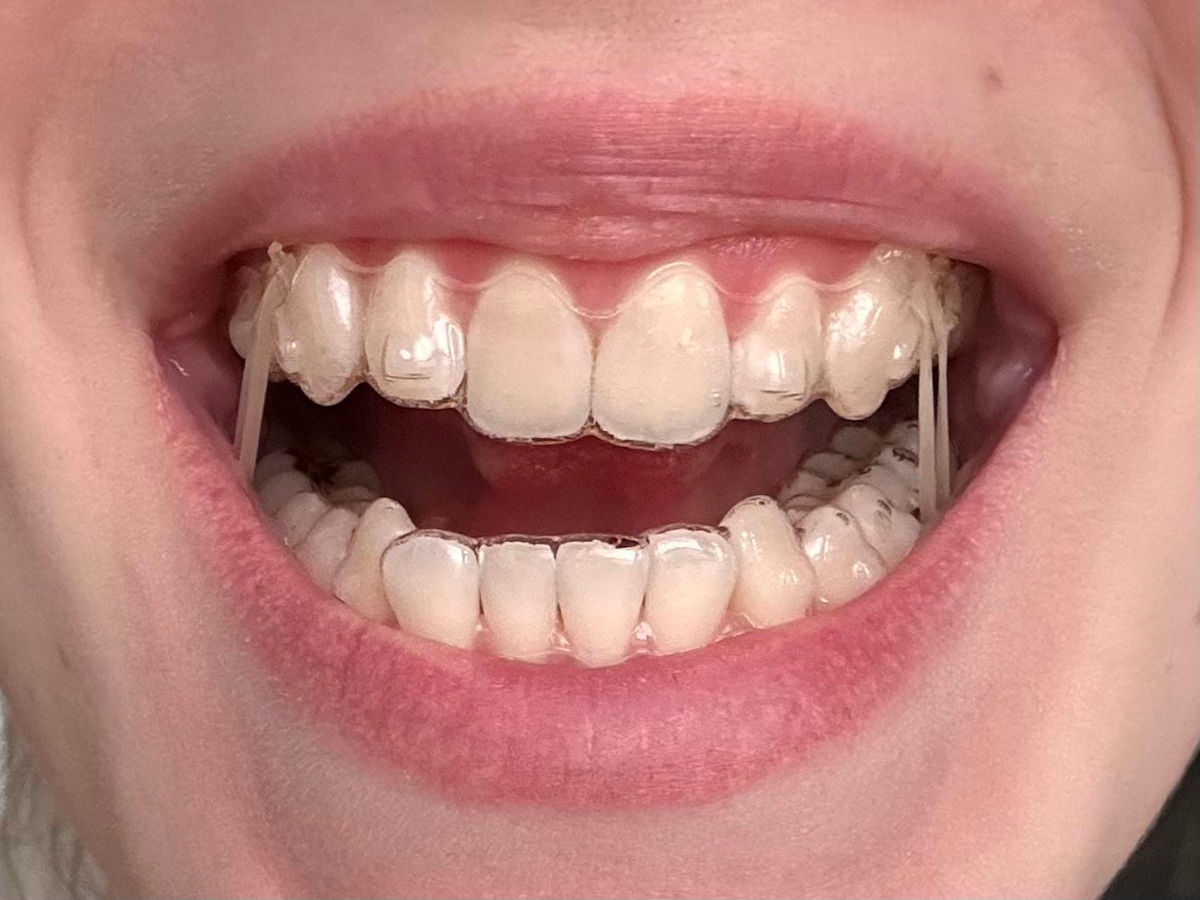
Elastics bridge that gap. By stretching a small rubber band from a hook or Precision Cut on the upper aligner to a hook or button on the lower (or vice versa), you create a continuous inter-arch force that guides the jaws into proper alignment. This is the same fundamental principle used in traditional braces -- the difference is simply in how the bands attach.
"Elastics are the unsung hero of Invisalign treatment. Patients tend to focus on the aligners themselves, but in cases requiring bite correction, the elastics are often doing the heaviest lifting. Without them, the teeth may straighten perfectly while the bite remains uncorrected." -- Dr. Kevin Tsai, Invisalign Faculty Speaker and Board-Certified Orthodontist, 2025
When Are Elastics Prescribed?
Your orthodontist will include elastics in your ClinCheck treatment plan when the digital simulation identifies a bite discrepancy that cannot be resolved by aligner forces alone. Common indicators include: an overjet (horizontal overbite) greater than 3 mm, a Class II or Class III molar relationship, an anterior open bite, or a posterior crossbite. The decision is made before treatment begins, so the Precision Cuts or hooks needed for elastic attachment are designed into your aligner trays from the start.
Types of Elastics Used with Invisalign
Not all elastics serve the same purpose. Your orthodontist will prescribe a specific configuration based on your bite diagnosis. Understanding the type you are using helps you grasp what the treatment is trying to achieve and why compliance matters so much.
| Elastic Type | Configuration | Bite Problem Addressed | Typical Force (oz) |
|---|---|---|---|
| Class II | Upper canine to lower molar | Overbite / Class II malocclusion | 3.5 - 6.0 |
| Class III | Lower canine to upper molar | Underbite / Class III malocclusion | 3.5 - 6.0 |
| Crossbite (Cross) | Buccal of one arch to lingual of opposing arch | Posterior or anterior crossbite | 2.0 - 4.5 |
| Vertical (Box) | Upper and lower teeth in a rectangular pattern | Open bite | 2.0 - 4.5 |
| Triangle | Three-point attachment (one tooth on one arch, two on the other) | Combined bite issues (e.g., open bite + midline shift) | 3.0 - 5.0 |
Class II Elastics for Overbite Correction
Class II elastics are the most commonly prescribed configuration with Invisalign. They run diagonally from the upper arch (usually from a Precision Cut near the upper canine or premolar) down and back to the lower arch (typically hooking onto a button bonded to a lower first molar). The downward-and-backward vector of force acts to retract the upper teeth while simultaneously advancing the lower teeth, effectively reducing the overjet and improving the Class II molar relationship.
Most patients need Class II elastics for 3 to 9 months, though the duration depends on the severity of the overbite and patient compliance. Clinical studies show that consistent elastic wear can correct a Class II relationship at a rate of approximately 1 mm of overjet reduction per 2 to 3 months of full-time wear.
Class III Elastics for Underbite Correction
Class III elastics work in the opposite direction. They run from the lower canine area up and back to the upper molar, creating a force that retracts the lower arch and advances the upper arch. This configuration is used to correct underbites and Class III molar relationships. While effective for dental (tooth-related) Class III problems, elastics cannot correct skeletal underbites caused by mandibular prognathism (a lower jaw that has grown too far forward), which may require surgical intervention.
Cross Elastics and Vertical Elastics
Cross elastics run from the cheek side (buccal) of a tooth on one arch to the tongue side (lingual) of the opposing tooth, creating a lateral force that corrects crossbites. Vertical elastics (sometimes called "box elastics" when four teeth are involved) create an extrusive force that pulls teeth together to close an open bite -- a condition where the front teeth do not touch when the back teeth are biting together.
Warning: Never Change Your Elastic Configuration
Each elastic configuration applies force in a very specific direction. Hooking elastics to the wrong teeth -- even one tooth off from the prescribed position -- can create unintended forces that move teeth in the wrong direction, worsen your bite, or cause root damage. Always follow your orthodontist's diagram exactly, and if you are unsure about placement, call the office before guessing.
How to Place and Remove Elastics with Invisalign
Placing elastics with Invisalign aligners is different from placing them with traditional braces. With braces, the bands hook onto metal brackets that are permanently bonded to teeth. With Invisalign, the attachment points can be either Precision Cuts (small notches built into the aligner edge) or bonded buttons (small metal or composite hooks cemented directly to a tooth).
Here is a step-by-step guide for placing elastics with Invisalign:
- Insert your aligners first: Always seat both the upper and lower aligners fully before attaching elastics. Use your Chewies to ensure a snug fit.
- Identify the attachment points: Your orthodontist will provide a diagram showing exactly which Precision Cuts or buttons to use. Review it each time until the process becomes second nature.
- Hook the elastic on one end: Most patients find it easier to start with the upper attachment point, as it is more visible in a mirror.
- Stretch and hook the other end: Open your mouth wide enough to reach the lower attachment point and hook the elastic in place. A small dental mirror can help if you are struggling to see the lower molars.
- Check the tension: The elastic should be stretched but not overly taut. It should feel like gentle, constant pressure -- not sharp pain.
Pro Tip: The Learning Curve
Almost every patient struggles with elastic placement for the first 3 to 5 days. This is completely normal. Many orthodontists recommend practicing in front of a well-lit bathroom mirror with a magnifying feature. Some patients use a small crochet hook or the Outie tool (a commercial elastic-placement aid) to hook bands onto hard-to-reach lower molar buttons. Within a week, most patients can place their elastics in under 30 seconds without a mirror.
Wear Time and Compliance Requirements
Elastic compliance is arguably the single biggest factor determining whether bite correction succeeds or fails within the planned treatment timeline. The minimum wear time for orthodontic elastics is 20 to 22 hours per day -- the same as the aligners themselves. You should only remove them when you remove your aligners for eating and oral hygiene.
| Compliance Level | Daily Wear Time | Expected Outcome | Treatment Timeline Impact |
|---|---|---|---|
| Full compliance | 20-22 hours/day | Bite correction on schedule | None -- treatment finishes as planned |
| Moderate compliance | 14-19 hours/day | Partial bite correction; slower progress | 2-4 months added |
| Poor compliance | Less than 14 hours/day | Minimal bite change; teeth may relapse between sessions | 6+ months added or treatment plan revision required |
| Night-only wear | 7-9 hours/day | Teeth relapse during the day; net progress near zero | Treatment goals not achievable |
Elastics lose their elasticity over the course of a day. Even if a band has not broken, its force output decreases by approximately 30 to 50 percent after 12 hours of continuous stretch. For this reason, you should replace your elastics at least once every 12 hours -- most orthodontists recommend carrying a bag of replacement bands with you at all times and swapping in fresh ones after lunch.
"I can tell within 30 seconds of looking at a progress scan whether a patient has been wearing their elastics. The teeth will be straight, but the bite will not have changed. There is no shortcut -- the physics of bone remodeling requires constant, sustained force." -- Dr. Amanda Liu, Orthodontist and Invisalign Diamond Provider, Houston, 2026
Common Challenges and How to Overcome Them
Wearing elastics with Invisalign presents several practical challenges that patients do not face with aligners alone. Here are the most common issues and evidence-based solutions:
- Jaw soreness: The first 3 to 5 days of elastic wear often produce aching in the jaw joints (TMJ area) and the muscles of mastication. This is normal and results from the new directional force. Over-the-counter ibuprofen and a soft diet for the first few days typically resolve the discomfort.
- Elastics snapping or breaking: Elastics can break during yawning, wide mouth opening, or eating (if you forget to remove them). Always carry spare bands. If you find yourself breaking multiple bands per day, notify your orthodontist -- you may need a different elastic size or force level.
- Buttons irritating cheeks or tongue: Metal or composite buttons bonded to teeth can create rough spots that irritate soft tissue. Orthodontic wax (applied over the button when elastics are not being worn) and salt water rinses can help. The irritation typically resolves within 1 to 2 weeks as a callus forms.
- Forgetting to put elastics back after meals: Set a recurring phone alarm or use the My Invisalign app's reminder feature. Some patients keep spare elastic bags in their car, office desk, and gym bag so they are never without them.
- Speaking with elastics: Elastics can temporarily affect speech, particularly "s" and "th" sounds. Reading aloud for 10 to 15 minutes daily accelerates the adaptation process. Most patients report normal speech within 3 to 5 days.
Elastics vs. Precision Wings and Mandibular Advancement
Align Technology offers an alternative to traditional elastics for Class II correction called Precision Wings (formerly known as the Mandibular Advancement feature). These are wing-shaped protrusions built directly into the upper and lower aligners that interlock when the patient bites down, holding the lower jaw in a forward position.
The choice between elastics and Precision Wings depends on several factors:
- Age: Precision Wings are most effective in growing adolescents (Invisalign First and Teen) where skeletal growth can be harnessed. In adults, elastics are generally preferred because skeletal growth is complete and dental compensation is the primary mechanism of correction.
- Severity: For moderate to severe Class II cases in adults, elastics provide more customizable force vectors than Precision Wings.
- Patient preference: Some patients prefer not dealing with loose rubber bands and prefer the integrated nature of Precision Wings. Others find the wings bulky and prefer the less visible elastics.
- Clinician experience: Some orthodontists have stronger clinical experience with one approach over the other and may recommend accordingly.
2026 Update: Hybrid Approaches
A growing number of orthodontists are now using hybrid protocols -- starting with Precision Wings in the early stages of treatment to establish a forward jaw position, then transitioning to targeted elastics in the finishing stages for fine-tuning the bite. This approach leverages the compliance advantage of Wings (they are always "on" when the aligner is in) with the precision of elastics for final adjustments.
What Happens If You Do Not Wear Your Elastics
The consequences of poor elastic compliance are predictable and well documented. When elastics are not worn consistently, the teeth straighten according to the aligner plan but the bite relationship does not change. This creates a scenario where you end treatment with beautifully aligned teeth that do not bite together correctly -- a functional and aesthetic failure that requires either a second round of treatment with elastics or a different intervention entirely.
Warning: The Real Cost of Non-Compliance
A mid-course correction due to elastic non-compliance typically adds 3 to 6 months to treatment and may incur additional costs if your treatment plan needs to be redesigned and new aligners manufactured. For patients on Invisalign Lite or Express plans, this can mean purchasing additional aligner sets at $300 to $500 per arch. Full compliance from the start is both the fastest and most economical path to your final result.
For patients who are finding elastic wear challenging, or who are experiencing tray fitting issues in addition to elastic-related concerns, open communication with your orthodontist is essential. There are often adjustments -- different elastic sizes, different attachment points, or modified wear schedules -- that can make compliance easier without compromising treatment outcomes.
Sources
- Align Technology, Inc. -- Invisalign SmartForce Features and Precision Cut Clinical Protocol, 2025-2026
- American Journal of Orthodontics and Dentofacial Orthopedics -- "Efficacy of Intermaxillary Elastics with Clear Aligners: A Prospective Clinical Trial," 2025
- The Angle Orthodontist -- "Compliance Rates and Treatment Outcomes with Elastics in Clear Aligner Therapy," 2025
- Journal of Clinical Orthodontics -- "Mandibular Advancement with Invisalign: Precision Wings vs. Traditional Elastics," 2026
- European Journal of Orthodontics -- "Force Degradation of Orthodontic Elastics: Implications for Replacement Frequency," 2025
FAQ: Invisalign Elastics
No. Elastics are only prescribed when the treatment plan requires inter-arch bite correction -- that is, changing how the upper and lower jaws relate to each other. Patients whose primary issue is crowding or spacing within a single arch, and who already have a healthy bite, typically do not need elastics. Approximately 35 to 40 percent of Invisalign Comprehensive cases include elastics, which means the majority of patients do not require them.
The duration varies significantly based on the severity of your bite problem and your compliance. Most patients wear elastics for a portion of their total treatment -- typically 3 to 12 months. Some patients need them for the entire duration of treatment, while others only use them during a specific phase. Your orthodontist can give you a more precise estimate based on your ClinCheck plan. Consistent wear (20-22 hours per day) is the single most important factor in determining how quickly the elastic phase is completed.
In most configurations, the elastics are minimally visible. Class II and Class III elastics typically run from the canine/premolar area back to the molars, which are outside the "smile zone" for most people. The bands themselves are clear or light-colored latex (or latex-free for patients with allergies). During normal conversation, they are essentially invisible. The most visible scenario is when vertical or triangle elastics are used on front teeth for open bite correction, but even then, the thin, clear bands are far less conspicuous than metal braces.
No. You should remove both your aligners and your elastics before eating or drinking anything other than water. Eating with elastics in place can cause them to snap, and food debris can get trapped around the buttons and Precision Cuts, increasing your risk of cavities. After eating, brush your teeth (or at least rinse thoroughly), reinsert your aligners, and then attach fresh elastics. The entire process should take no more than 5 to 10 minutes once you are practiced.
Contact your orthodontist's office as soon as possible to schedule a rebonding appointment. In the meantime, continue wearing your aligners without the elastic on the affected side. Do not try to attach the elastic to a different tooth as a substitute -- this would apply force in the wrong direction. Most offices can rebond a button in a quick 10 to 15 minute appointment, often squeezed in the same day or next day. Frequent button debonding (more than twice on the same tooth) may indicate the tooth surface needs additional preparation or a different type of button should be used.